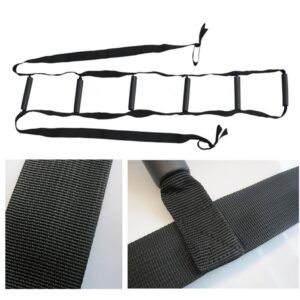
How to Install an Adjustable Bed Ladder Assist Rope So It Actually Stays Put
The number one reason a bed ladder assist rope fails is not the product—it is the installation. A ladder that is anchored to a loose bed leg, draped over a mattress without a fixed point, or adjusted to the wrong height will shift under load. That shift is the difference between a safe sit-up and a fall. Here is the installation process that works, and the bed types that require extra attention.
Step 1: Identify a Fixed Anchor Point
The ladder must attach to a part of the bed that does not move when the user pulls. On a traditional bed frame, the legs at the foot of the bed are the standard anchor point . Loop the strap around the leg, thread it through the buckle, and pull tight.
What if there is no frame leg? Platform beds and beds with solid bases require improvisation. Users have successfully strapped the ladder to slats under the mattress, or created anchor points by screwing hardware into the bed base . The key is a point that will not flex, slide, or detach when pulled at an angle.
Step 2: Route the Strap Over the Mattress—Not Under
The ladder lies on top of the bed surface, with the handles positioned along the length of the mattress. The strap should run from the foot anchor point, over the mattress, toward the head of the bed. Do not route the strap underneath the mattress unless the bed design specifically requires it. Under-mattress routing reduces accessibility and can create pressure points.
The trip hazard check:Some ladders include a pull rope or extension that extends beyond the handles. One reviewer warned: “The rope system to pull the ladder up can be in the way and one has to be careful not to trip over it” . Position any excess strap or rope where it will not be stepped on during nighttime bathroom trips.
Step 3: Adjust the Length Before the User Gets In
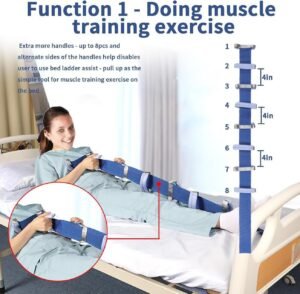
The critical measurement: with the user lying flat on their back, the first (lowest) handle should reach their waist level. This allows them to grip the first handle without stretching or twisting, then pull hand-over-hand to the next handle as they rise.
To adjust: release the buckle, slide the strap to the correct length, and re-lock. Then test the lock by pulling firmly on the strap before the user touches it. A buckle that slides under this test is not secure enough for use.
Step 4: Test the Anchor Under Load—Not Just by Hand
Grab the first handle and pull firmly, simulating the angle and force the user will apply. The strap should not slide through the buckle, the anchor point should not shift, and the bed frame should not creak or move. If any of these happen, reposition or reinforce the anchor.
Step 5: Teach the Hand-Over-Hand Technique
Installation is only half the job. The user needs to know how to use the ladder correctly. The safe sequence: roll slightly to one side, bend the knees, grip the first handle with an overhand grip, pull to a seated position, then move the second hand to the next handle if additional height is needed .
Bed Type Compatibility: What Works and What Needs Modification
-
Traditional bed frame with legs:Direct anchor to foot legs. Easiest installation.
-
Adjustable bed:Anchor to a stationary frame section. Confirm the strap does not interfere with the moving platform or the mattress articulation. Test all bed positions (flat, elevated head, elevated legs) before use.
-
Platform bed with slats:Anchor to a slat or add a dedicated anchor point. Do not rely on the mattress alone to hold the strap.
-
Hospital bed:Anchor to the frame at the foot of the bed. Avoid side rails—they are not designed for angled pull loads.
-
Travel or temporary setup:Choose a ladder with a compact strap and a secure buckle that can be removed and reinstalled without tools.
Bottom line:An adjustable bed ladder assist rope is only as safe as its anchor. Take five minutes to identify a fixed point, adjust the length correctly, and test the load before the user relies on it. That five minutes prevents the most common and most dangerous failure.